|
I-cord is a knitted cord or tube that is often used for decoration (such as trimming the edges of cushions). I use i-cord in my patterns for making stalks and stems for my fruit and vegetables, basket handles, and as tails for mice, but you can also use it for shoelaces! 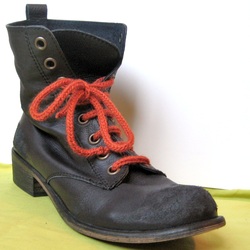 I-cord is made using double pointed needles (DPNs), but it is not knitted in the round. You will only use two DPNs, and slide the knitted piece from one end of the needle to the other as you knit each row. I-cord is usually made on 3, 4 or 5 stitches; the more stitches you use the wider the finished tube will be. How to make i-cord 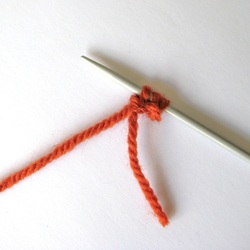 Step 1 Step 1 In this tutorial I am making i-cord on 3 stitches . Please note, the instructions are for right handed knitters. STEP 1) Cast on 3 stitches on one DPN. With the cast on stitches on the left needle, knit one row using the other DPN as your right needle (just like regular knitting). You will now have 3 stitches knitted on the left hand end of the right needle. The working yarn is at the left hand end of the needle. 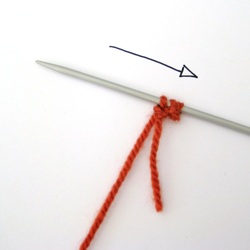 Step 2 Step 2 STEP 2) At this point in regular knitting you would turn the work. To make i-cord you do not turn. Now you slide the stitches from the left hand end of the needle to the right hand end of the needle before knitting the next row. 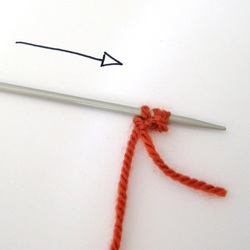 Step 3 Step 3 STEP 3) Now take the needle with the stitches on in your left hand. The working yarn is at the left hand end of the needle (not the right hand end as it would normally be with regular knitting). 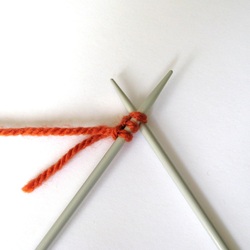 Step 4 Step 4 STEP 4) Knit the first stitch on the left hand needle, pulling the working yarn up firmly behind the stitches (at the back of the work). This pull will bring the edges of the knitted piece together to form a tube. 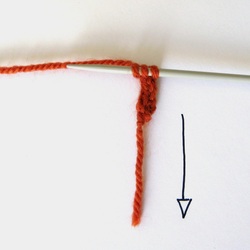 Ensure your first stitch is tight, otherwise your i-cord may look a bit baggy. Then knit the 2nd and 3rd stitches as normal. You now have 3 stitches knitted on your right hand needle, and the working yarn is at the left hand end of the needle. Repeat steps 2, 3 and 4 for a few rows, sliding the knitted stitches from one end of the needle to the other before knitting each row. Then pull down gently on the cast on edge at the bottom of the cord as this helps to form a neat tube. 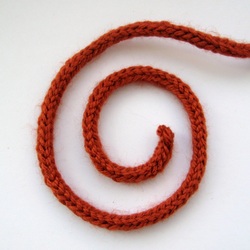 Once your i-cord is the desired length, you can cut the yarn and thread through the stitches on the needle, and pull tightly to bind off. For a 2-page print-and-keep pdf copy of these instructions, click on the link below.
6 Comments
Adrienne Portia Stocks
11/11/2020 09:03:09 am
Hi Amanda
Amanda
11/11/2020 09:13:39 am
To stabilise the legs, insert a cocktail stick inside the i-cord leg, and trim the bottom end so it is hidden inside the knitting. Make sure the stick goes into the body too.
Sylvie Geldart
6/22/2021 06:01:31 am
I'm knitting the birthday cake.Can you explain
Amanda Berry
6/22/2021 10:39:15 am
Here is a link to a tutorial showing how to get started with magic loop, which is what "join to work in the round for magic loop" means:
Sylvia Genner
7/14/2023 08:59:56 am
I am knitting the graduation owl for my granddaughter but just can't seem to get the feet right. Can you help ?
Amanda Berry
7/14/2023 02:05:18 pm
Can you please email your query as the email address you provided with your blog comment was rejected when I responded. Your comment will be posted after it is approved.
Leave a Reply. |
|||
